First steps running a Cloud Task on Spring Cloud Data Flow
Wednesday, November 7, 2018Introduction
Appropriately or inappropriately everyone is talking about microservices. When using Java, Spring feels very much the natural choice; especially given the existence of Spring Boot - a ridiculously simple way to build standalone applications (e.g. a REST service) with an embedded runtime (like Tomcat or Jetty). It’s been a long farewell to heavyweight application servers, but with such simple and effective solutions the sun is finally beginning to set.
However, there’s no getting away from the need to ingest and integrate data. Every enterprise has a requirement for it in some shape or form. And while some of these needs are being fulfilled by modern solutions like real time streaming (i.e. a message arrives and a processor does something useful with it), significant amounts of workload are unashamedly batch like processes - which frequently touch files, existing services and relational, and, non-relational datastores. There is often the requirement to reliably perform scheduled tasks against data - maybe once a day or once an hour. In all honesty, I trust the maturity of Java and Spring when solving such problems (especially for reasons of language maturity, transactions and JDBC). It’s an inescapable fact that companies want to modernise their workload - by resigning from the infrastructure hosting job and moving the contents of their data centres to a cloud provider. Paying for only what you use and having, to all intents and purposes, unlimited scalability are enticements you would find hard to argue against. So being cloud native should mean an end to running your own cluster of application servers, which consume huge amounts of memory and often sit idle for long periods of time. This is where the awesome team at Spring knew they could add value and hence Spring Cloud Data Flow was born.
There’s an initially daunting diagram on Spring’s website that tells you most of what you need to know. In essence the Spring Cloud Data Flow server runs and co-ordinates your data centric microservices. It can initiate tasks (or multiple tasks in a sequence - known as composed tasks) and record their results. It interacts with Spring Cloud Deployer so your tasks can run on a Kubernetes cluster, Cloud Foundry or even a local JVM for testing purposes. I am purposefully concentrating on tasks, but remember those modern streaming solutions I mentioned earlier - well Spring has your back covered there too. The Data Flow server allows streams to be glued together (source, processor, sink) and deployed. Spring Batch is also going strong and such batch applications can be executed from a Data Flow server instance.
What do you manage via a Spring Cloud Data Flow server? The answer: Spring Boot applications, which through annotations are marked as a Spring Cloud Task or a Spring Cloud Stream.
It sounds great doesn’t it? Well the best way to understand is to do. So in today’s post I’ll write a trivially simple task and aim to execute it. Then next time I want to deploy my task to a Kubernetes cluster and see how easy and reliable that is. I want to answer the question: is Spring Cloud Data Flow ready for prime time and does the brilliant concept have a brilliant implementation behind it.
Running the Data Flow server
The quickest way to get started is with the Docker image, which also adds many example stream and task application definitions to your server. If you don’t want it to import all the example applications then just remove the “app-import” service (which does nothing more than start a linux server and add the applications via REST calls). I am pretty old school so downloading the following JAR and running it manually works too:
$ java -jar spring-cloud-dataflow-server-local-1.7.0.RELEASE.jar
A lot happens when you execute the JAR - an in memory H2 database starts and has SQL scripts executed against it using Spring’s ScriptUtils, Hibernate fires up and Tomcat starts on port 9393. We can explore the usage of these components later, but for now navigate to http://localhost:9393/dashboard/
![]()
There you will find the Data Flow Server up and running. It looks pretty neat. Now we need a task to register and run.
Building a task
First I navigated to the Spring Initializer . I am still sticking with Maven, so I used that alongside the latest snapshot (2.1.0) of Spring Boot. I want a task to run on my shiny new Data Flow server, so I added dependencies to “Cloud Task” and “JDBC” (the latter of which I will use from my application in a future post):

A click of the Generate Project button later and we have a zip file containing a barebones Maven project. I imported the project into Intellij and ran the main method of SimpleCloudTaskApplication , only to be greeted by an error including an helpful hint:
Failed to configure a DataSourceIf you want an embedded database (H2, HSQL or Derby), please put it on the classpath.
Clearly the JDBC dependency needs a database driver and database. I put H2 (an in memory database, whose JAR ships with a driver too) as a dependency in the pom.xml:
<dependency><groupId>com.h2database</groupId><artifactId>h2</artifactId></dependency>
and fired it up again:
Started SimpleCloudTaskApplication in 0.923 seconds (JVM running for 1.404)Process finished with exit code 0
Cool! So my task executed and when finished the JVM exited. In this basic first version I am not interested in doing anything exotic, so I wrote a simple CommandLineRunner to print the numbers 1 to 10:
@SpringBootApplicationpublic class PlanetJonesHelloTask {public static void main(String[] args) {SpringApplication.run(PlanetJonesHelloTask.class, args);}@Beanpublic CountToTenTask countToTenTask() {return new CountToTenTask();}public class CountToTenTask implements CommandLineRunner {public void run(String… args) throws Exception {IntStream.range(1, 11).forEach(System.out::println);}}}
Spring Boot will see there’s a CommandLineRunner via the exposed @Bean and run it. You could have more than one and it will run them sequentially. Of course you can also pass arguments to the Constructor of the CommandLineRunner, so you could run it multiples times in the same task application with different behaviours.
I am a stickler for automated tests, so even though this is trivial I added one:
@RunWith(SpringRunner.class)@SpringBootTestpublic class PlanetJonesHelloTaskTests {@Rulepublic OutputCapture outputCapture = new OutputCapture();@Testpublic void itCountsToTen() {SpringApplication.run(PlanetJonesHelloTask.class);String output = this.outputCapture.toString();String lineSeparator = System.getProperty(“line.separator”);assertTrue(output.contains(“1”+ lineSeparator + “2”+ lineSeparator + “3”+ lineSeparator + “4”+ lineSeparator + “5”+ lineSeparator + “6”+ lineSeparator + “7”+ lineSeparator + “8”+ lineSeparator + “9”+ lineSeparator + “10”));}}
org.springframework.boot.test.rule.OutputCapture is neat, as it allows you to do assertions on what is printed to the standard output stream - a good way of understanding the behaviour of your application and asserting on it.
The beauty of Spring Boot is you can run this on your own - there’s no EAR or WAR file to deploy. You don’t need a deployment descriptor. You just need a JVM and you execute the main method.
Next I executed the Maven install goal, so the artefact got installed in my local Maven repository:
mvn install
Success. The Maven URI to tell Data Flow where to find this will be:
maven://co.uk.planetjones:planetjones-hello-task:jar:0.0.1-SNAPSHOT
Running my first task
Using the Maven URI you register the Task application in Spring Cloud Data Flow:

Then you have to navigate to Tasks and create a Task Definition out of the Spring Boot Task application. This seems a little unnecessary when I just want to run a single Task application, but Data Flow let’s you create composed Tasks, so the approach is consistent irrespective of how many tasks you want to execute. Here it is:

Note: all of this can be done using the REST API or Spring cloud shell, if automation and devops are your thing - but I think initially it’s good to use the web application itself to visualise what is happening.
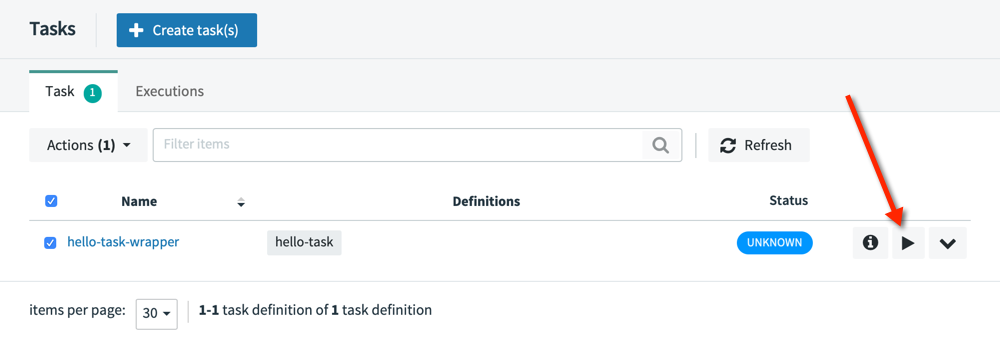
Once you’ve added another name - this time for the Task Definition (I chose hello-task-wrapper) you’re all set. Time to hit the Run button:
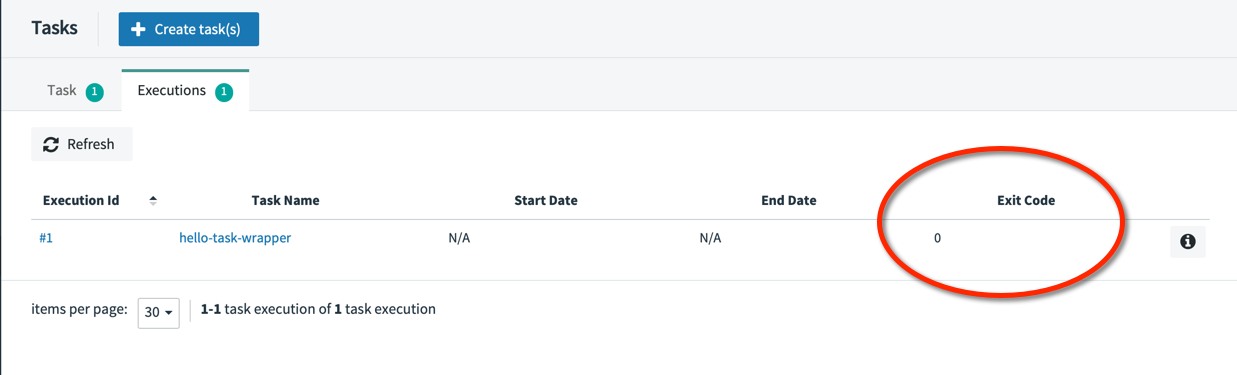
The executions tab in the Data Flow web application shows an Exit Code of 0 (success).:
And the log of the Data Flow server shows the task was launched and points to the stdout and sterr logs (that is pretty neat that each task’s output is piped to a file for free):
o.s.c.d.spi.local.LocalTaskLauncher: launching task hello-task-wrapper-84357567-26a9-46a7-9f72-620069c5cf46Logs will be in /var/folders/gx/v1l1g40142z8pr24l3bdsm8m0000gn/T/hello-task-wrapper4659591445802586192/1541240567122/hello-task-wrapper-84357567-26a9-46a7-9f72-620069c5cf46
If we look in the stdout.log file we see the same output as when running the main method of our task:
. ____ _ __ _ _/\\ / ___'_ __ _ _(_)_ __ __ _ \ \ \ \( ( )\___ | '_ | '_| | '_ \/ _` | \ \ \ \\\/ ___)| |_)| | | | | || (_| | ) ) ) )' |____| .__|_| |_|_| |_\__, | / / / /=========|_|==============|___/=/_/_/_/:: Spring Boot :: (v2.1.0.RELEASE)2018-11-03 11:22:48.190 INFO 21488 --- [main] c.u.p.s.PlanetJonesHelloTask: Starting PlanetJonesHelloTask v0.0.1-SNAPSHOT on planetjones-iMac.local with PID 214882018-11-03 11:22:48.194 INFO 21488 --- [main] c.u.p.s.PlanetJonesHelloTask: No active profile set, falling back to default profiles: default2018-11-03 11:22:49.002 INFO 21488 --- [main] c.u.p.s.PlanetJonesHelloTask: Started PlanetJonesHelloTask in 1.23 seconds (JVM running for 1.79)12345678910
So what just happened
Well the reference to LocalTaskLauncher in the log gives a large clue:
- I clicked the button to execute the task
- The Data Flow server sees the task is a Maven resource and locates the JAR file. The Eclipse Aether library is used behind the scenes, to perform the Maven artefact resolution process (see more at the spring-cloud-deployer repository). In my case the artefact only exists in my local Maven repository, so that’s where it is retrieved from
- A deployment request is sent using the local app deployer and a new JVM is launched from the JVM running the Spring Cloud Data Flow server .
- The task executes in its own JVM and the result is saved to the H2 database tables , from where it is visualied by the Spring Cloud Data Flow web application. The log files are persisted to disk.
- When the task has finished the JVM spawned to run the task exits. Each invocation of the task will use a new JVM, so you don’t need to worry about left over state between executions
The log shows the process id (pid) of the JVM used to execute the task. Now of course this isn’t production ready by any means, but it’s an effective demonstration of the concept behind Spring Cloud Data Flow. When you consider the deployment could be to Kubernetes or Cloud Foundry (though you’ll need Docker artefacts for that) the possibilities start to sound really exciting.
Continuous Deployment is covered too - you can modify your code and install to the local Maven repository. The next time the Task executes the new version would be used. That’s a pretty easy deployment process - no painful installation and crucially no impact on currently running tasks.
@EnableTask
You might notice some screenshots above which show N/A values for the Start Date and End Date of tasks. Me too! The root cause here was I had omitted the @EnableTask annotation from my application:
@SpringBootApplication@EnableTaskpublic class PlanetJonesHelloTask {
It seems this is needed for certain lifecycle hooks, including the communication of start and end times. Once this is added the Data Flow execution log looks much better:

Summary
The concept of Spring Cloud Data Flow, in my opinion, is fantastic. Of course this is a very superficial example, so I would like to next look in more detail how this all works works and aim to achieve the following:
- Get the task deployed to a Kubernetes cluster
- Get the Spring Cloud Data Flow server production ready (real database, security)
- Run some streams (input, processor and sink)
There are excellent videos from Pivotal’s Spring One conference, which introduce many aspects of Spring Boot and Spring Cloud Data Flow.
You can see all of the code for this post at Github.