Relaunching my personal website as planetjones.net
Wednesday, May 3, 2023Like many other people I have the good intention of writing more; but it always seems more interesting to rebuild this site with a new technology instead 😉. However, by moving planetjones.co.uk to planetjones.net I hope to find the motivation to publish at least a few blog posts a year. And the first of 2023 starts here - where I describe how I rebuilt this modest website and switched its domain name. Details include building a custom Hugo theme, how my “Out of 10” reviews are stored in Notion and how a workflow from GitHub Actions automatically builds my content and uploads it to Dreamhost with the help of rsync.
Learning Hugo and Bootstrap 5 to create a custom theme
This took about 5 hours to get a basic site up and running. The general advice is use one of the pre-built Hugo themes and tweak it. However I found this more confusing than starting from scratch.
Hugo was installed using Brew. Then I created a new site and custom theme using the command line:
1hugo new site planetjones
2cd planetjones
3hugo new theme planetjonesTheme
In layouts/baseof.html I added this:
 1<!DOCTYPE html>
 2<html>
 3    {{- partial "head.html" . -}}
 4    <body>
 5        {{- partial "header.html" . -}}
 6        {{- block "main" . }}{{- end }}
 7        {{- partial "footer.html" . -}}
 8        {{- partial "script.html" . -}}
 9    </body>
10</html>
I recommend starting the same way and simply adding some text to the referenced files e.g. header.html so you can understand what Hugo is doing. Then I defined the main block for my single posts in /themes/planetjonesTheme/layouts/single.html:
1{{ define "main" }}
2<div class="container">
3    <div class="row">
4        <h1>{{ .Title }}</h1>
5        {{ .Content | safeHTML -}}
6    </div>
7</div>
8{{ end }}
My content is stored in the content/posts directory which includes individuals files for each of my posts (so this post has its own file in the content/posts directory). A Section in Hugo is a collection of pages; in my case a collection of posts. The single.html file above will be used to render each post by taking the content from its definition and rendering it underneath the <h1> heading.
Once I had a feel for the basics, the rest was essentially copying and pasting examples from the Bootstrap website and Hugo website. Along the way there were some interesting learnings:
Hugo’s content can be HTML or Markdown. For new content like this post I use markdown files, but for migrating posts from planetjones.co.uk I copied the html into a .html file inside the posts directory e.g.
/content/posts/cold-weekend-in-copenhagen.html. In/themes/planetjonesTheme/layouts/_default/single.htmlI told Hugo it was safe to render the copied HTML using{{ .Content | safeHTML}}I like my URLs to end with .html. To enable this set
uglyURLs = trueinconfig.toml. Also to to keep the paths in the URL the same as my previous website I changed the permalink URL as follows:1[permalinks] 2 posts = '/blog/:day-:month-:year/:slug/'Bootstrap’s grid is pretty simple to work with. The key quote from the documentation is “Column classes indicate the number of columns you’d like to use out of the possible 12 per row”. So in the example below on a viewport below large (up to 991px by default) A will be stacked on top of B. However once the user’s viewport becomes large or above (more than 991px) A will be to the left of B i.e. the page will have two columns side-by-side. That is the fundamental concept behind Bootstrap’s grid system. You can, of course, customize how it changes based on the user’s viewport size even further e.g. having a different layout between extra large and large or hiding certain elements on smaller viewports
 1<div class="container-fluid">
 2    <div class="row">
 3        <div class="col-sm-12 col-lg-6">
 4            A
 5        </div>
 6        <div class="col-sm-12 col-lg-6">
 7            B
 8        </div>
 9    </div>
10</div>
Make sure you’re familiar with Bootstrap’s utility classes. For example adding a
class="mt-3"to an element adds a margin of size$spacerto its top. The default size of$spaceris 1rem (16px). These little tweaks are invaluable to make elements look betterShortcodes in Hugo are handy. The in-built highlight shortcode makes all of the code snippets on this page look pretty. I added a custom shortcode to render images i.e.
{{< img "/my_image.png" "My image" >}}. Once that shortcode is included in a post Hugo looks for a file called/themes/planetjonesTheme/layouts/shortcodes/img.html. I populatedimg.html, so thatimgelements automatically receive theimg-fluidBootstrap class and the parameters in position 0 and 1 are substituted into the HTML appropriately:1<img src="https://static.planetjones.net{{ (.Get 0) }}" 2 alt="{{ (.Get 1) }}" 3 class="img-fluid"/>When using a shortcode it is important to add a blank line before and after it, otherwise I found hugo rendered an empty
<p>element which looked odd
Storing and extracting my reviews via Notion
I store all of my “Out of 10” reviews in a Notion database. Notion is a productivity tool that I have used for many years and its free tier recently became even more attractive. The database looks like the screenshot below:
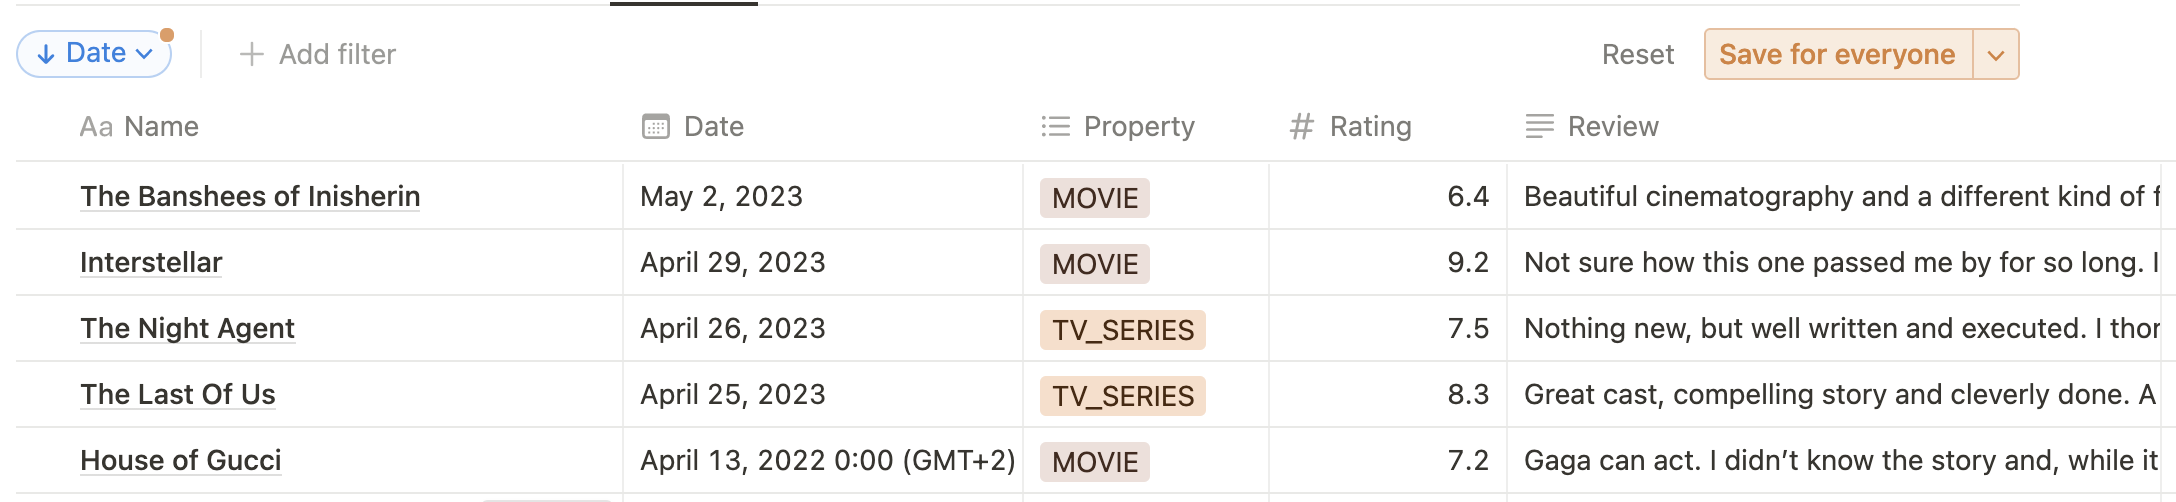
Whenever I review something new I add it to the database using Notion’s Mac or iOS application. To retrieve the entries in a json file that can be used by Hugo’s data template support I wrote a program to call Notion using its JavaScript SDK.
My client application’s run-time is node.js. The contents of my app.js file is below. Its configuration e.g. my Notion database id is injected into the program using environment variables; as is the the Notion integration token. To use the Notion API you must generate an integration token for your workspace.
 1const { Client } = require("@notionhq/client");
 2const fs = require("fs");
 3
 4const notion = new Client({
 5    auth: process.env.NOTION_SECRET
 6})
 7
 8const databaseId = process.env.OUT_OF_TEN_DATABASE_ID;
 9
10var findAndMapNotionResults = async function () {
11
12  const response = await notion.databases.query({
13    database_id: databaseId
14  });
15
16  const mappedResult = response.results.map((page) => {
17    return {
18       _id: page.id,
19      title: page.properties.Title.rich_text[0].plain_text,
20      link: page.properties.Link.url,
21      outOfTen: page.properties.Rating.number,
22      review: page.properties.Review.rich_text[0].plain_text,
23      date: page.properties.Date.date.start,
24      category: page.properties.Property.multi_select[0].name
25    };
26  });
27
28  results = JSON.stringify(mappedResult);
29  path = process.env.PATH_TO_WRITE_FILE;
30
31  fs.writeFileSync(path, results, err => {
32    if (err) {console.error(err);}
33  });
34
35  return results;
36}
37
38findAndMapNotionResults().then(() => {
39  process.exit();
40});
The confusing part is the asynchronous nature of node.js. When the application is executed via node app.js the findAndMapNotionResults function is executed. As it’s marked async it returns a Promise. The then method of the Promise executes when the Promise becomes fulfilled i.e. when all the code in the findAndMapNotionResults function has executed. In my case when the Promise is fulfilled the program exits. Inside findAndMapNotionResults it’s important to write the file synchronously (using fs.writeFileSync) otherwise the program will exit before it has had chance to write the file. Likewise the async functions it calls i.e. notion.databases.query needs to have the async keyword added before, so that the program waits for that function to complete before continuing (it is waiting for the Promise to be fulfilled or rejected).
In the code above mappedResult is an array of objects, which is populated by mapping the Notion API response to a more user friendly structure. This means each object in the array is a lot easier to work with, as the sample object demonstrates below:
1 {
2  "_id":"1",
3   "title":"The Title",
4   "link":"https://alink.com",
5   "outOfTen":10.0,
6   "review":"What I have to say",
7   "date":"2000-01-01",
8   "category":"TV_SERIES"
9 }
Rendering my “Out of 10” reviews
My Out of 10 reviews render as a separate page. I created /content/out-of-ten.md with the following content:
1---
2title: "Out of 10"
3date: 2023-04-22T16:41:57+02:00
4draft: false
5layout: "out-of-10"
6url: out-of-10.html
7---
The URL means that you can access all of Out of Ten reviews from /out-of-10.html. The key part is to specify a custom layout, which is referenced by "out-of-10". This will load the layout file at /layouts/page/out-of-10.html. Inside this file I again define the main block using {{ define "main" }}. If you refer to earlier in the article it is always this main block which will be rendered between the contents of header.html and footer.html:
 1{{ define "main" }}
 2<div class="container-fluid">
 3    <div class="row">
 4        {{ range sort ( .Site.Data.ratings ) "date" "desc" }}
 5        <div class="col-12 col-sm-6 col-lg-4 col-xl-3 col-xxl-2 ">
 6            {{- partial "out-of-10-rating.html" . -}}
 7        </div>
 8        {{ end }}
 9    </div>
10</div>
11{{ end }}
container-fluid means the block will fill 100% of the viewport’s width. .Site.Data.ratings instructs Hugo to read the ratings.json file which was produced by app.js and has been saved in the /data directory. On xxl displays (> 1200px by default) there should be 6 columns on screen, so the out-of-10-rating.html partial will be displayed 6 times on a single line. When the resolution is (by default) less than 576px there will only be one column, so the content will be stacked on top of each other.
My partial (/themes/planetjonesTheme/layouts/partials/out-of-10-rating.html) renders just one object from the JSON (or one element in .Site.Data.ratings). The advantage in using partials is they can be included in any layout; meaning I can use the same partial to render the most recent reviews on the homepage of this website. I removed some of the content below for brevity but you should get the general idea of how content from the JSON file is rendered. You can always inspect the source on this website to see the full verbosity.
 1<div class="card flex-inline">
 2    <div class="card-header ">
 3        {{ .title }}
 4        </div>
 5    </div>
 6    <div class="card-body">
 7       {{ .review }}
 8    </div>
 9    <div class="card-footer">
10        {{ if eq .category "TV_SERIES" }}
11          Render TV icon
12        {{ end }}
13        {{ if eq .category "BOOK" }}
14          Render Book icon
15        {{ end }}
16        {{ .date | time.Format ":date_long" }}
17    </div>
18</div>
Automating the Hugo build and publish to Dreamhost using GitHub Actions
Of course my whole website is stored in a private git repository on GitHub. Using the Github CLI you can create a new repository as simply as typing gh repo create and then following the prompts. Personally I then use vscode for editing files, committing changes and pushing back to GitHub.
Before showing the GitHub action I use for publishing this website the first thing is to look at how ssh is configured so the workflow in GitHub can publish changes to Dreamhost. If you’re familiar with ssh, you will know that when connect to an unknown host you are prompted to say if you trust it. An interactive prompt would not be a good thing when a pipeline is running on its own (running headless). Therefore the first step I took was to identify the public key of planetjones.net by using the ssh-keyscan tool which is pre-installed on MacOS:
1ssh-keyscan planetjones.netI copied the ssh-rsa line into a new file which I called my_known_hosts. The contents of my_known_hosts now looked like this:
1planetjones.net ssh-rsa AAAAB3Nza...Next I generated a public and private key pair. This was achieved by using ssh-keygen as per the example below. Once the keys are generated you will have both the public key (id_rsa.pub) and private key (id-rsa) in your .ssh directory. ssh-copy-id is now used to install the public key on the target server. For Dreamhost sites you will need to enable ssh first. In the example below I needed (for the last time) to enter my password for username@domain_name:
1ssh-keygen -t rsa
2Generating public/private rsa key pair.
3Enter file in which to save the key (/Users/planetjones/.ssh/id_rsa):
4ssh-copy-id -i ~/.ssh/id_rsa.pub username@domain_name
5Number of key(s) added:        1
Once that’s done any client using the private key (file without the .pub extension) will be able to to log-in to your server without being prompted for a password. One such client is my GitHub Actions workflow which I wanted to automatically publish my website using rsync. Therefore GitHub will need my private key, so I copied the contents of it (id_rsa) to my clipboard and stored it as an encrypted secret on Github. I called my secret DHOST_KEY.
The ssh part above is the most difficult step. After completing this set-up I was able to write my GitHub workflow, which I copy in its entirety below. I have added comments to try and help explain what each instruction is for.
 1name: Deploy Hugo site to Dreamhost
 2
 3# Any push to main branch will trigger this workflow
 4on:
 5  push:
 6    branches: ["main"]
 7
 8# Neccessary to allow manual executions of the workflow
 9  workflow_dispatch:
10
11defaults:
12  run:
13    shell: bash
14
15jobs:
16  build:
17    runs-on: ubuntu-latest
18    env:
19      HUGO_VERSION: 0.111.3
20    steps:
21      - name: Install Hugo
22        run: | # The | Allows multiple commands to be executed line by line
23          wget -O ${{ runner.temp }}/hugo.deb \
24          https://github.com/gohugoio/hugo/releases/download/v${HUGO_VERSION}/hugo_extended_${HUGO_VERSION}_linux-amd64.deb \
25          && sudo dpkg -i ${{ runner.temp }}/hugo.deb
26      - name: Checkout
27        uses: actions/checkout@v3
28        with:
29          submodules: recursive
30      - name: Update ratings.json with node
31        env:
32          NOTION_SECRET: ${{secrets.NOTION_SECRET}}
33          OUT_OF_TEN_DATABASE_ID: YOUR_DATABASE_ID
34          PATH_TO_WRITE_FILE: ${{ github.workspace }}/local_directory/data/ratings.json
35        run: | # The | Allows multiple commands to be executed line by line
36        # Installs the dependencies declared in package.json then runs app.js
37         npm install
38         node app.js
39        working-directory: ./node
40      - name: Build using Hugo
41        env:
42          HUGO_ENVIRONMENT: production
43          HUGO_ENV: production
44        run: hugo --minify
45        working-directory: ./local_directory
46      - name: SSH set-up
47        run:  | # The | Allows multiple commands to be executed line by line
48          # For debugging
49          pwd
50          # Creates the .ssh directory, but will not fail if it's already there
51          mkdir -p ~/.ssh
52          # Reads my_known_hosts are redirects it (writes it) to the known_hosts file on the server
53          cat ${{ github.workspace }}/my_known_hosts >> ~/.ssh/known_hosts
54          # Writes the private key stored at Gitub to the private key on the server
55          echo "${{ secrets.DHOST_KEY }}" > ~/.ssh/id_rsa
56          # Gives appropriate permissions
57          chmod 700 ~/.ssh #
58          chmod 600 ~/.ssh/id_rsa
59          chmod 600 ~/.ssh/known_hosts
60        working-directory: ./local_directory/public
61        # If f you have issues you could temporarily allow the download of your private key as an artifact
62#      - name: 'Upload SSH Key'
63#        uses: actions/upload-artifact@v3
64#        with:
65#          name: my-private-key
66#          path: ~/.ssh/id_rsa
67#          retention-days: 1
68      - name: RSYNC to Dreamhost
69        # Runs rsync in archive mode (so verbatim copy of files) from Hugo's public directory to directory_on_server
70        run: rsync -e "/usr/bin/ssh" -avv ./local_directory/public/ username@domain_name:directory_on_server
71
Overall I am very impressed with Github Actions. Their documentation is clear, the execution of workflows is fast, the user interface is clean and snappy, and there is a very generous free tier available; even when using private git repositories like mine.
Informing Google about the change
Both planetjones.co.uk and planetjones.net were registered in the Google Search Console. Ownership verification was achieved by adding a TXT record to both domains. Once that’s done Google’s instructions are clear to follow. Dreamhost did offer a 301 redirect service but I found it didn’t work properly for paths, so I uploaded the following .htaccess file instead:
1    Options +FollowSymLinks
2    RewriteEngine on
3    RewriteRule (.*) https://www.planetjones.net/$1 [R=301,L]
Conclusion
And that’s it. Welcome to the new planetjones.net. And while I am under no illusion that I will become a prolific poster, I do at least hope to provide some content semi-regularly.